How to Create a Group Account with ZOOM video teleconferencing
For Faculty and Administrators
This quick-start guide will provide faculty and administrators the basic procedures for creating a group ZOOM account which will allow the host (the one creating the account) to invite up to 500 people to participate in a video teleconference. This document does not cover the creation of accounts for instructors of Spring 2020 Courses, as those accounts will be provisioned automatically. For more information on resources available to instructors wishing to use online teaching resources, please visit:
https://teachingremotely.uchicago.edu/
Detailed instructions on how to create a virtual classroom once a host account is created can be found here:
NB: Before requesting any type of Zoom Account (group or individual) make sure you know your billing/FAS information. If you do not have this information, contact your representative in the Local Business Office before requesting the account.
|
CNET ID |
Last name |
First Name |
FAS# |
|
|
|
|
|
How to Request a Group Zoom Account
1. Request a Zoom account.
a. Go to:
https://its.uchicago.edu/web-conferencing/
b. Scroll down to:

c. Please note: You do not need a Zoom account in order to attend a meeting. You only need a Zoom account to host Zoom meetings.
2. Log in via Shibboleth with your CNET ID and password & fill out the form.
a. Please note: To create an account, you must have a valid University Cost Center number, also known as a Financial Accounting System (FAS) number. If you do not have this information, please contact your administrator for guidance before submitting a request for a Zoom account.
3. To create a Group Account

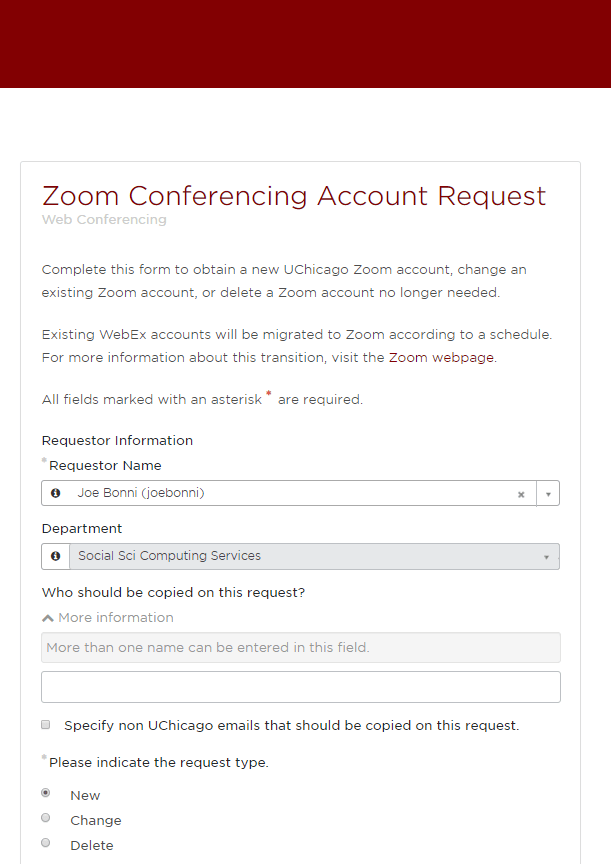
a. Enter your name as requestor
i. Your department affiliation should automatically be filled
b. Select “New” from “Please indicate request type”
i. By selecting “New” a series of additional choices will be made available:

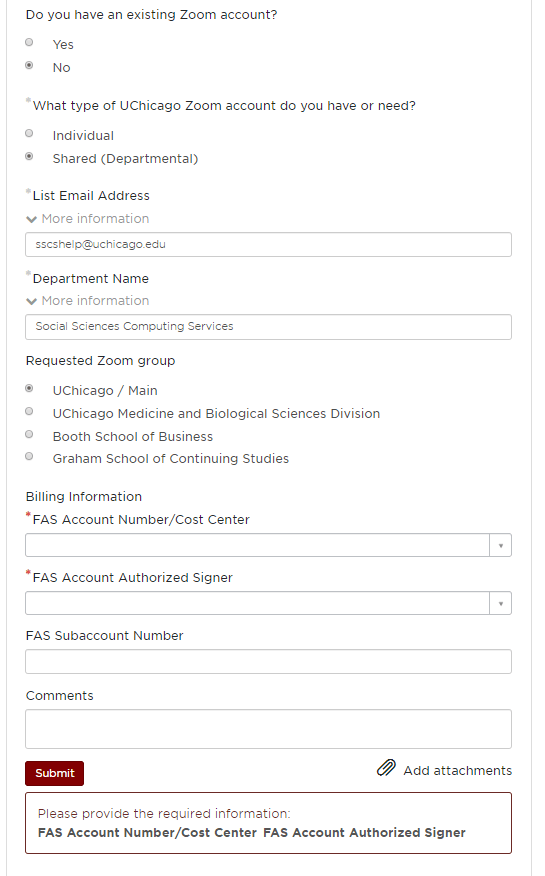
c. Select “Shared (Departmental)” as the type of Zoom account you need.
d. Enter the e-mail address you want to use to link the Group account to.
e. Select “UChicago / Main” from “Requested Zoom Group”
f. Enter all requested Billing Information
g. After submitting the request, it can take up to 3 business days before you receive your confirmation e-mail with a link to activate your ZOOM account.
4. Activating your Group Account
a. You will receive an e-mail from no-reply@zoom.us with a link to activate your account. Click on the “Activate Your Zoom Account” link.
b. At the Activation Page click on “Sign Up with a Password”
c. Follow the instructions using your name and crate a password:

d. After clicking “continue” a “Personal Meeting url” will be created
i. The url will always be available in your account should you need it.
ii. You may also download plug-ins to use ZOOM in Outlook and in Google’s Chrome Browser quickly and easily. It is recommended but not necessary to download and install these options.
e. Select “Go to My Account”
i. Here you can find the url that you can share to invite others to meetings you host as well as general information about your account.
5. We recommend a quick test meeting to become familiar with Zoom:
a. Enter uchicago.zoom.us into your web browser.
b. Click on the Sign in button.
c. Enter your CNetID and password.
d. Click on the “Host A Meeting” link on the top right corner of the screen and select “With Video On” to test your camera.
e. If prompted click Open zoom.us.
f. A Zoom meeting window will open where you can test and experiment with your audio and video equipment and get to know your host controls.
For detailed Instructions for faculty to use ZOOM to create a virtual classroom see ITS’ guide here:
https://uchicago.service-now.com/it?id=kb_article&kb=KB06001455